This document shows you how to use this applet in a step-by-step manner. You should have the applet open; toggle back and forth between the ShowMe file and the applet as you work through these instructions.
Exercise 1
Set the spring constant to 200 N/m, and keep the mass and the amplitude at their default values of 1.25 kg and 0.20 m, respectively. Display the Data box.
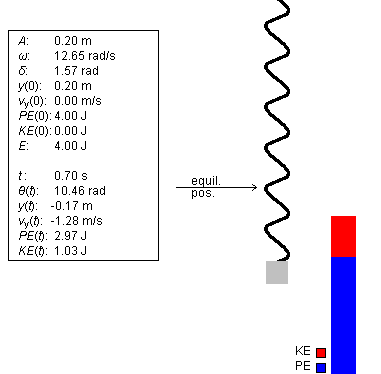
Start the motion from its default position, which has the weight in its top position, such that the phase has the value Δ = π/2 = 1.57 rad. Play the motion, and Pause it at or near t = 0.70 s. The spring, energy bar, and Data box should similar to that shown in Figure 1:
Figure 1
The ratio of the kinetic energy portion (red) and potential energy portion (blue) of the energy bar should correspond to the ratio of these energies as displayed in the Data box. In the case shown in Figure 1 above, this ratio has the value KE/PE = 1.03/2.97, which is close to 1/3.
Exercise 2
Continuing from Exercise 1, click "Rewind". The weight should return to its top position. Drag the weight from the top to the bottom of its range of motion, and observe the variation in the potential energy.
You should find that the potential energy goes from its maximum value when the weight is at the top, to its minimum value when the weight is at the equilibrium point, back to its maximum value when the weight is at its lowest point.
Exercise 1
Reset the applet. Start the motion at t = 0 with the suspended weight at its top position. Display both the position vs. time and potential energy vs. time graphs and arrange them as shown in Figure 2. Set the spring constant to 200 N/m, the mass to 1.00 kg, and keep the amplitude at 0.20 m.
Play the motion until the oscillation has gone through a bit more than one complete cycle, so that the weight has just started moving down again. The two graphs should look similar to those shown in Figure 2 below. Ignore the position and velocity vectors for now.
To display the graphs, click on the Graph control button. For details on using the Graph panel, please see the Help file.
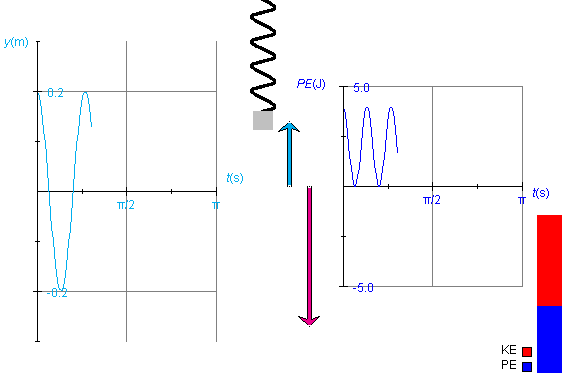
Figure 2
y is the position of the centre of the weight. The y-axis increases in the upward direction, with y = 0 at the equilibrium position. The potential energy PE is proportional to y2,
PE = (k/2)y2
Therefore, as y decreases, reaches 0, and decreases further to negative values, PE decreases, reaches 0, and increases again to positive values. As a result, the frequency of oscillations of the potential energy PE is twice that of the frequency of the displacement y.
Observe that on the horizontal axis the time t is plotted in seconds (s). Don't be mislead by the unusual divisions labeled π/2 and π. These are in seconds, not in radians. Thus, the point where the y vs. t graph crosses the t-axis for the first time is at a time slightly before t = π/8 s. The reason for dividing the time axis in this way is so that the expression for the period T of the oscillating spring is
T = 2π (m/k)
(m/k)
The presence of π in this expression makes it natural to divide the time axis into segments that are multiples (or fractions) of π.
Also observe that the maximum y-value is equal to the amplitude, A = 0.20 m, and that the maximum value of PE is related to that of A according to the expression for PE given earlier,
PE = (k/2)A2 = (200/2)×0.202 = 4.0 J
Exercise 2
Continuing from Exercise 1, hide the position vs. time graph and display the kinetic energy vs. time graph instead, in addition to the potential energy vs. time graph. Arrange the graphs so that they don't overlap. To do so, move one graph at a time by selecting only that graph's movability checkbox in the Graph Panel.
Click "Rewind" to put the weight back to its top position, and click "Reset" in the Graph panel (NOT the main "Reset" control button) to clear the two graphs. Then Play the motion again through a bit more than one cycle.
You should again obtain the PE vs. t graph shown in Figure 2 above. The KE vs. t should look like the "inverse" of the PE vs. t graph, i.e. KE should be decreasing when PE is increasing and vice versa.
Exercise 3
Continuing from Exercise 2, check the "pos" and "vel 1" checkboxes in the Control Panel to display the position and velocity vectors of the oscillating weight in blue and magenta, respectively. These vectors are shown in Figure 2.
The potential energy is proportional to the square of the length of the position vector and the kinetic energy is proportional to the square of the length of the velocity vector.
Select and deselect the Zoom control button. The velocity vector and the two graphs should decrease by a factor of 2 in length or height. Then deselect the control button again to restore the original heights.
The energy bar programmed not to be affected by the Zoom control button because its total length will not grow beyond the standard height of the applet display panel under the conditions available in the applet.
Exercise 4
Continuing from Exercise 3, click "Rewind" and reset the two graphs in the Graph panel. Change the mass from 1.00 kg to 0.50 kg. Play the motion long enough to cover a little more than one cycle.
You should be able to observe the same kinetic and potential energy graphs as in Exercise 3, but the velocity vector should have a larger amplitude than before. Depending on your display panel size, you may have to use the Zoom control button to keep the entire vector within the applet display panel at all times.
The reason for the change in the magnitude of velocity without a corresponding change in the kinetic energy is as follows. Changing the mass does not affect the potential energy. Since the total mechanical energy E is equal to the potential energy at the start when KE = 0, the total energy is not affected by a mass change either. Therefore, the kinetic energy cannot be affected since KE = E - PE.
However, if KE is not affected by a mass change, then the speed must be affected, in accordance with the following equation.
KE = (m/2)v2
Exercise 5
Reset the applet, and change the value of the spring constant from 80 N/m to 200 N/m. Display all three energy graphs (potential, kinetic, and mechanical energy). Keep all three graphs superimposed on each other in one place.
Play the motion through a bit more than one cycle. You should obtain graphs similar to those shown in Figure 3 below.
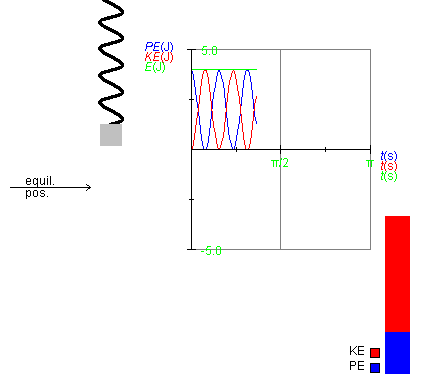
Figure 3
The three graphs may have to be moved a bit to prevent them from overlapping with the energy bar. To move them, check the movability icon for all three graphs in the Graph panel, and then drag the graphs. Note that they will move together as one unit.
Observe that the green graph for the energy E is a straight horizontal line at the tops of the KE and PE graphs. Also observe that the graphs have gone through a bit more than two cycles, while the motion itself has gone through a bit more than one cycle.
The applet lets you vary the values of the three quantities k, m, and A. In the following exercises you will be asked to examine the dependence of the potential energy on these three variables. More precisely: the potential energy is a function of time during the weight's oscillation and takes on its maximum value both at the top and bottom positions of the weight. The exercises are about this maximum value, whether it depends on k, m, and A. In this connection, remember that the expression for the potential energy is:
PE = (k/2)y2
Exercise 1
Reset the applet, display the Data box by selecting the Data control button, and change the spring constant from 80 N/m to 50 N/m.
Make a drawing of the height of the potential energy bar and record the value of the potential energy as given in the Data box.
Use the slider to change the spring constant to 200 N/m. Again, draw the potential energy column next to the one already drawn, and record the value of the potential energy shown in the Data box. Are the results consistent with the equation for the potential energy above?
Observe that making the spring constant stiffer will be indicated visually by a thickening and shortening of the spring. The applet is designed to keep the weight in the centre of the applet display panel when the system is in equilibrium. Thus, as the spring gets stiffer (k increases), the point from which the spring is suspended moves down towards the fixed equilibrium point. The point of support is above the applet display panel and therefore invisible. However, you will be able to see a downward movement of the turns of the spring as the spring gets stiffer.
Exercise 2
Continuing from Exercise 2, use the slider to change the mass of the suspended weight from 1.25 kg to 2.00 kg.
Increasing the mass of the suspended weight is represented visually by an increase in the size of the suspended weight. Increasing the mass will also stretch the spring (the invisible point of suspension will move upward).
Is there any change in the height of the potential energy bar or in the value of the potential energy shown in the Data box? Are your observations consistent with the expression for the potential energy given above?
Exercise 3
Use the slider to change the amplitude from 0.20 m to 0.30 m.
Draw the height of the potential energy column next to the columns drawn earlier, and record the value of the potential energy shown in the Data box. Are the changes you observe consistent with the expression for the potential energy given above?
Exercise 1
Reset the applet. Display the Data box by selecting the Data control button. Click on the Data box, and drag it to a convenient location in the applet display panel.
As an example, Figure 4 below shows the contents of the Data box corresponding to the situation shown in Figure 3 above. To reproduce the values shown in Figure 4, you need to recreate the situation depicted in Figure 3.
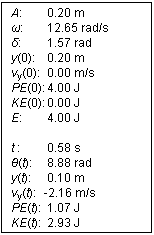
Figure 4
The top half shows the constants and initial conditions for the motion, the bottom half the values of the variables at time t. The mechanical energy E is shown only in the top portion because it is a constant of the motion. For a detailed explanation of the items in the Data box, please see the Help file.
Physics 20-30 v1.0
©2004 Alberta Learning (www.learnalberta.ca)
Last Updated: June 16, 2004