Lesson 1 - Vector Addition: Graphical
Vector Addition: Graphical
constructs the sum of two vectors using either the tip-to-tail or parallelogram method of
vector addition.
Prerequisite
Students need a basic working knowledge of vector properties (magnitude
and direction).
Learning Outcomes
Students will be able to graphically add two vectors using the Tip-to-Tail and the
Parallelogram methods of vector addition.
Instructions
Students should understand the applet functions that are described in Help and ShowMe.
The applet should be open. The step-by-step instructions on this page are to
be done in the applet. You may need to toggle back and forth between instructions
and applet if your screen space is limited.
Contents
- Constructing the Resultant (Sum) of Two Vectors
- Tip-to-Tail Method
- Parallelogram Method
1. Constructing the Resultant (Sum) of Two Vectors
There are two methods for graphically constructing the sum of two vectors:
the Tip-to-Tail Method and the Parallelogram Method . Both methods
will produce the "sum of two vectors", which is referred to as the
resultant.
Both methods can be used to add more than two vectors by first adding any two
vectors, then adding their resultant to a third vector using the same method,
etc.
|
 The
applet will be used to demonstrate the Tip to Tail method of vector addition.
-
If the applet screen is not empty, clear it by clicking
"Reset" ( ). ).
-
Draw two vectors in the applet window using "Vector"
( ).
The applet will label the two vectors ).
The applet will label the two vectors  and
and  . .
-
Arrange the two vectors so that the tail-end of vector
is aligned with the tip of
vector as shown in Figure 1.
For the purpose of this lesson, you may want to adjust the vectors
to look like those in Figure 1.
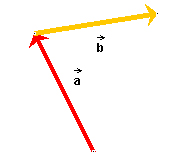
Figure 1
|
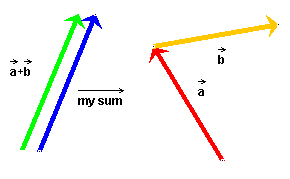
- To draw the resultant, click "Vector Sum" (
 )
and draw the vector from the free tail end of the arrangement shown
in Figure 1 to the free tip. The result is illustrated in Figure 2.
The applet draws your resultant in blue and labels it "my sum".
The resultant shown in Figure 2 is the correct resultant. )
and draw the vector from the free tail end of the arrangement shown
in Figure 1 to the free tip. The result is illustrated in Figure 2.
The applet draws your resultant in blue and labels it "my sum".
The resultant shown in Figure 2 is the correct resultant.
There is an easy way to remember the direction in which to draw the resultant.
Think of the two vectors as displacements, with one displacement following
another. The resultant is the overall (net) displacement from the point
where the first displacement starts to the point where the second
displacement finishes.
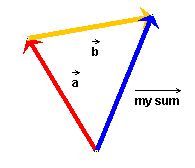
Figure 2 |

Using the
applet, create the following and vectors and identify which resultants are
correct and which are incorrect.

In the lower boxes, show the tip-to-tail method of vector addition and the resultant
vector for each set of vectors in the upper boxes. Use the applet to verify
your answers.
a) |
b) |
c) |
d) |
Resultant:
|
Resultant:
|
Resultant:
|
Resultant:
|
|

The
applet will be used to demonstrate the Parallelogram method of vector
addition.
- If the applet screen is not empty, clear it by clicking "Reset"
().
- Draw two vectors in the applet window. The applet will label the two
vectors and
. For the purpose of following this lesson, you may want to adjust your
vectors to look like those in Figure 4.
- Join the two vectors tail end to tail end, as in Figure 4.
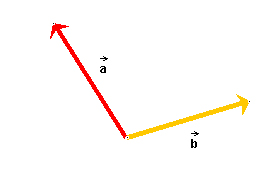
Figure 4
|
|
Think of these two vectors as spanning a parallelogram (forming two sides
of a parallelogram whose other two sides still need to be constructed).
The applet lets you draw the remaining two sides of the parallelogram with
dotted lines. The resultant vector goes from the point where the tail ends
of the vectors join to the opposite corner of the parallelogram.
- To make sure that the dotted lines are parallel to the given vectors,
draw the lines initially on top of the two vectors. Then move them into
their correct positions by making them intersect the tips of the respective
vectors.
- Finally, you can compare your resultant to the correct resultant drawn
by the applet as described at the end of the section on the Tip-to-Tail
method.
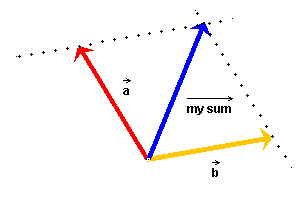
Figure 5
|
|

Complete
the following table by:
- drawing the parallelogram for the vectors in the top row of the table.
- drawing the resultant for the vectors in the top row of the
table.
- drawing the resultant for the vectors in the bottom row of the table using
the Tip to Tail method.
The first one has been completed as an example:
Parallelogram Method:
a) Parallelogram
|
b) Parallelogram
|
c) Parallelogram
|
d) Parallelogram
|
Tip to Tail Method:
a) Tip-to-Tail
|
b) Tip-to-Tail
|
c) Tip-to-Tail
|
d) Tip-to-Tail
|
Does the Parallelogram method give the same resultant as the Tip-to-Tail
method?

Using any two vectors and , demonstrate
that +
= +.
Use the Tip-to-Tail method to show that the resultant is the
same regardless of which vector is put down first.
Physics 20-30 v1.0
©2004 Alberta Learning (www.learnalberta.ca)
Last Updated: June 16, 2004
 button becomes active. When you click this button, the applet will draw
the correct resultant in green and label it
button becomes active. When you click this button, the applet will draw
the correct resultant in green and label it